

TABLE OF CONTENTS
- Open a New Contact Sheet
- Favorites, Navigator, and Tasks
- Select Images
- Rename Files
- Context-Sensitive Menus
- Rotate, Metadata (IPTC) Info, and Preview
- Information Under Thumbnail Images
- Multiple Contact Sheets
- Controlling the Size of Thumbnails
When you launch Photo Mechanic for the first time you will see an empty Contact Sheet window and the main menu bar at the top of the screen.
The Contact Sheet View in Photo Mechanic is the main window to view thumbnails of all of your images, whether you ingest them from your memory card or open folders on your hard drive. Contact sheets allow you to rapidly cull for keepers, give star ratings, and more.
Open a New Contact Sheet
There are 4 quick ways to start culling your photos in Photo Mechanic:
1. Select File > New Contact Sheet Tab (Command - N MacOS) to open a blank Contact Sheet within the main window. Then drag and drop a folder into the main part of the Contact Sheet. Any images within that folder will be displayed as a series of thumbnails.
2. Select File > Open Contact Sheet (Command - O MacOS, Ctrl - O Windows) to open an existing folder as a new Contact Sheet. A "Choose a folder to browse" window will appear on macOS and a "Please select a folder to open as a contact sheet" window will appear on Windows so you can navigate to the folder you wish to work with.
3. Drag a folder from the operating system's file browser onto the Photo Mechanic icon.
4. Open a new contact sheet by double-clicking on a folder in either the Navigator or Favorites panels.
Note (Windows only): The default On Startup behavior is to open the "Please select a folder to open as a contact sheet" window. This window will only display folders, not image files. Once you single click or double-clicked a folder with images inside, select the "Select Folder" button at the bottom right to view the images in a Contact Sheet.

Favorites, Navigator, and Tasks
The contact sheet has three main panels: Favorites, Navigator, and Tasks.
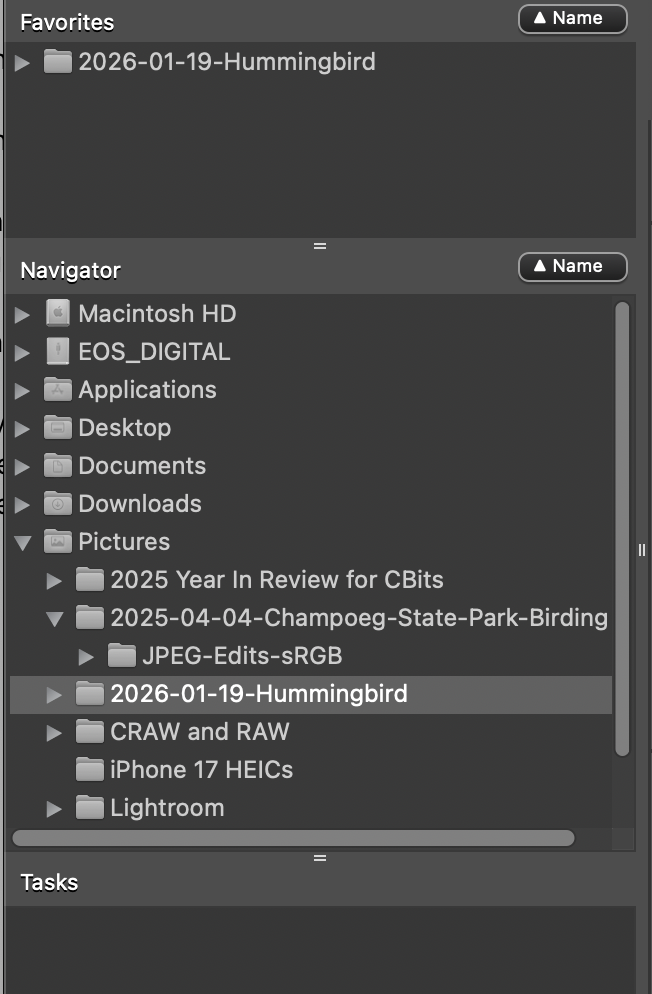
The Navigator is a view of how folders containing files are organized on your computer.
Favorites are shortcuts to folders you want to reopen in a contact sheet. Add folders to your favorites list by dragging from the Navigator or by right-clicking a folder or tab and selecting Add to Favorites.
Tasks will show progress for Photo Mechanic processes such as ingest and FTP upload.
By default Photo Mechanic starts with an empty Contact Sheet window. You can set it to instead present an folder picker window, or you can have it open the last opened Contact Sheet. This setting can be set in the General tab of the Preferences/Settings window.
- Dragging a folder into the contact sheet area will open it as a contact sheet and replace the current tab. Double click will open a folder as a contact sheet in a new tab.
- You can drag images from the contact sheet view onto any folder to move them, or hold the Modifier key (Option on MacOS and Shift on Windows) to copy them instead of moving them.
- To remove a Favorite Folder, right-click (Control - Click on macOS) on it and choose Remove.
- In the macOS version of Photo Mechanic, you can set a color label for folders by right-clicking (Control - Click) and choosing Color Label.
- You can add a new folder within an existing folder: An expandable triangle appears next to a parent folder that contains sub-folders.
- To combine two folders into one contact sheet, right-click (Control - Click on macOS) the folder you want to add into an already open Contact Sheet and select Open in Current Contact Sheet. Holding the Modifier Key and double clicking on a folder name opens the folder in the current contact sheet window.
- To open images inside a parent folder and the sub-folders inside it in one Contact Sheet, right click (Control-click on macOS) the parent folder in the Navigator panel, then choose either Open Folder and Subfolders in New Contact Sheet or Open Folder and Subfolders replacing Contact Sheet.
- To remember the set of folders you are currently browsing as a contact sheet tab use File>Remember Folders as a Favorite... This allows you to set a name for the set of folders and then creates a multi-folder favorite in the Favorites panel.
Note for Photo Mechanic on macOS: When you start Photo Mechanic for the first time, the operating system should prompt you to grant permission for Photo Mechanic to access various folders such as Desktop and Documents, as well as Removable Volumes such as memory cards and external storage drives (if they are physically connected).

To manage these permissions, navigate to macOS's System Settings>Privacy & Security>Files and Folders. See https://support.apple.com/en-is/guide/mac-help/mchld5a35146/mac for more information.

You can alternatively choose to grant Photo Mechanic Full Disk Access by navigating to macOS's System Settings>Privacy & Security>Full Disk Access. Select the toggle next to Photo Mechanic to grant the permission. You will prompted to enter your macOS password or use Touch ID to grant the permission.

If Photo Mechanic is not listed, select the plus ( + ) button at the bottom left of the list. A Finder window will open to the Applications folder where you can navigate to the Photo Mechanic.app, select it, then select the Open button.
The Tasks pane will show you the progress of longer actions Photo Mechanic is completing, such as memory card ingests, copying files, or FTP uploads. Double-clicking on a progress bar will open a progress dialog and give you options to resolve any errors in the task.
To remove task items from the list, select the task item, then select Clean up.
To stop a task that is in progress, select the task from the list, then select Stop.

Select Images
In order to perform operations such as renaming files, moving them to a new location, or Apply a Metadata Template, on a group of images, you will first need to select those images on the Contact Sheet. When an item is selected on the Contact Sheet, the color of the background behind the item will change color (by default, this color is yellow, but this can be changed in Preferences.
There are several ways to Select images:
- Selecting a single image: Click on that image.
- Selecting Multiple images:
- Hold the Command key (MacOS) or the Control key (Windows) while you click on individual Contact Sheet items. Each item that you click will be added to the selection.
- To select all items in the current Contact Sheet, press Command - A (MacOS), or Control - A (Windows) or use the Edit>Select All menu option.
- To select all items between two images in a Contact sheet, click on a the first image you want, and then hold the Shift key while clicking on the last item for that selection.
- To select all Tagged images, press Command+T (MacOS), or Control - T (Windows), or use the Edit>Select Tagged menu option.
- You can Select Images based on other attributes, such as their Star Rating, Color Class Label, or other Metadata. These options are available in the Edit menu.
Note: There are several ways to Search in Photo Mechanic, and some of those methods will change which items are selected on the contact sheet.
Rename Files
The filename is always the first text label under the image thumbnail.
- Renaming a single item: Double-click on the filename in order to rename it
- Renaming a selection of items: Make a selection in the Contact Sheet. In the File menu, select Rename Photos or use the keyboard shortcut (Command - M on Mac, Ctrl - M on Windows).
Context-Sensitive Menus
Photo Mechanic has context-sensitive menus. Right-clicking (or Control-click on macOS) on a thumbnail, or selection of thumbnails, brings up a menu of available operations. The same commands can be found in the various menus.
macOS right click context menu:


Above the series of thumbnails, you can find controls to switch from selector to loupe cursor. You also have options to sort and filter thumbnails within a contact sheet, such as sorting by image width or displaying only certain star ratings.
Rotate, Metadata (IPTC) Info, and Preview
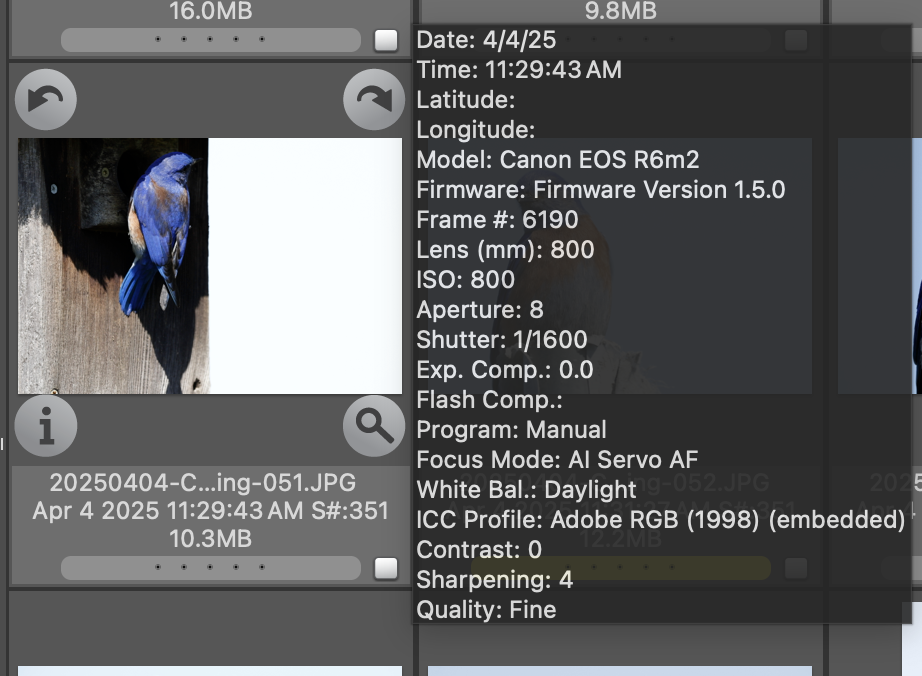
When you place your cursor over an image without selecting it, you will see an overlay with metadata from the image. The metadata overlay can be toggled on or off by selecting View->Show Info Tooltips. You will also see four buttons at the thumbnail's corners. The arrows in the top corners rotate the image. Read more about rotating images. The "i" opens up the Metadata (IPTC) Info tool. Read more about using the Metadata (IPTC) Info tool. The magnifying glass opens up the Preview window. Read more about the Preview window.
Information Under Thumbnail Images
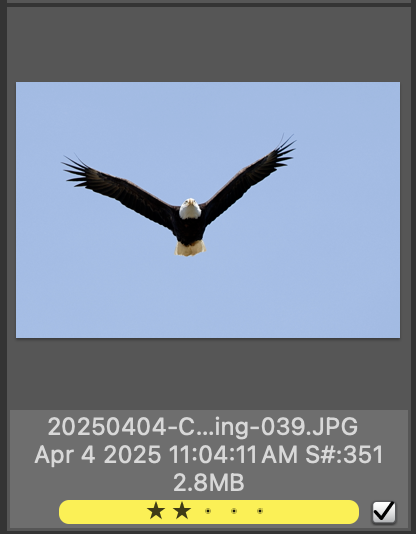
Each thumbnail image shows the color class (the yellow bar in this example), tags (the checkbox), and the star rating of the image. You can change or set these directly in the contact sheet.
If you are using Photo Mechanic Plus, you can also see if an image is currently indexed in a catalog and whether the media is connected (the green dot.) There are up to three lines of text under each thumbnail to give you quick information about each image, such as the name of the file or the folder path. You can customize the text so that it is useful for your workflow.
Multiple Contact Sheets
You can have multiple contact sheets open at the same time. They’ll show up as tabs near the top of the screen. You can rearrange tabs by selecting and dragging. You can also rapidly toggle between open tabs using the keyboard shortcuts:
- Command- Shift - } : Move one tab to the right.
- Command - Shift - { : Move one tab to the left.
- Hold down the Control key and use the left or right arrows to navigate.
Controlling the Size of Thumbnails

Use the slider above the contact sheet thumbnails to control the size of thumbnails.